
Application
In 30 seconds
Extend DefaultApplication, launch with preloadAndLaunch(args), and point firstModelClass() at your first screen Model. JRebirth boots the engine, preloader, scene, and attaches that Model on the JavaFX thread.
How to use
- Create a class extending
DefaultApplication<YourRootPane>(root pane type = scene root, e.g.StackPane). - Add
public static void main(String... args) { preloadAndLaunch(args); }as the application entry point. - Override
firstModelClass()and return the Model class shown at startup (mandatory). - Optionally override
customizeStage,customizeScene(CSS viaaddCSS), andgetResourceToPreload. - Run your Application class as the JavaFX main class from the IDE or Maven
javafx:run.
Overview
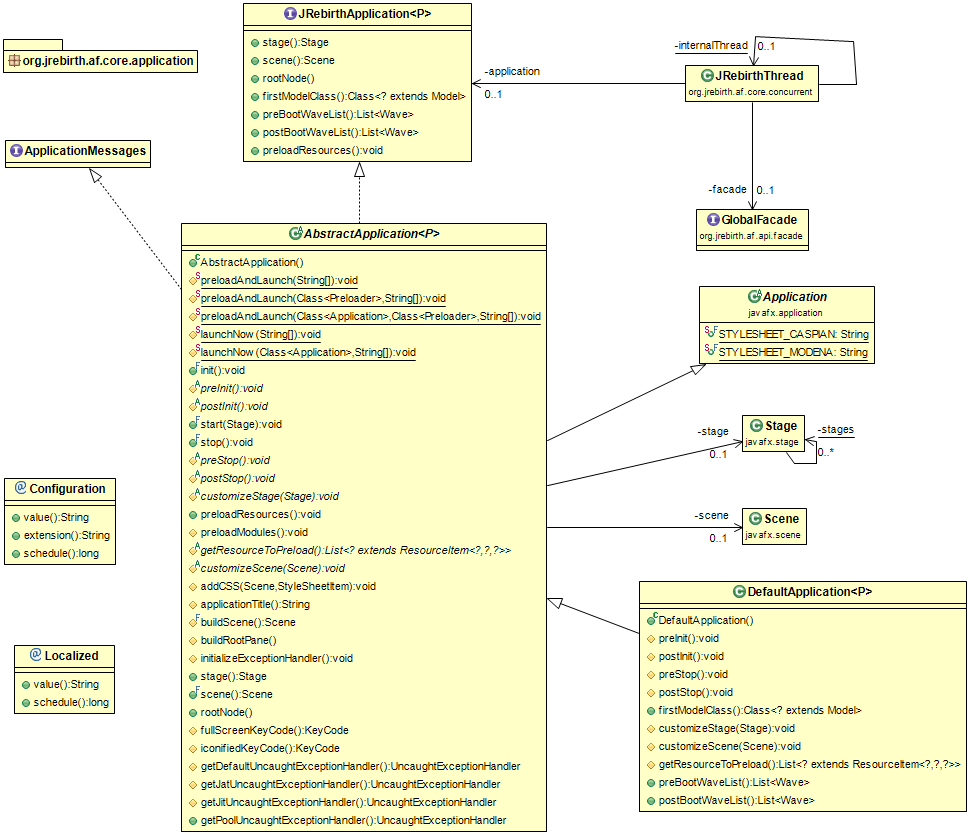
JRebirth Application Framework offers a custom class that extends the basic javafx.Application class. Its aim is to automatically start the JRebirth underlying Application Framework without doing complex stuff.
Short UML Diagram:
Application Start-Up
To trigger the start-up of your JavaFX application you must add a static void main method in order to call one of the static protected method provided :
package org.jrebirth.af.core.application;

import java.lang.Thread.UncaughtExceptionHandler;
import java.net.URL;
import java.util.ArrayList;
import java.util.List;
import java.util.ServiceLoader;
import java.util.stream.Collectors;

import javafx.application.Application;
import javafx.application.Preloader;
import javafx.application.Preloader.ProgressNotification;
import javafx.scene.Scene;
import javafx.scene.SceneAntialiasing;
import javafx.scene.image.Image;
import javafx.scene.input.KeyCode;
import javafx.scene.input.KeyEvent;
import javafx.scene.layout.Pane;
import javafx.stage.Stage;

import org.jrebirth.af.api.application.Configuration;
import org.jrebirth.af.api.application.JRebirthApplication;
import org.jrebirth.af.api.application.Localized;
import org.jrebirth.af.api.exception.CoreException;
import org.jrebirth.af.api.log.JRLogger;
import org.jrebirth.af.api.module.ModuleStarter;
import org.jrebirth.af.api.resource.ResourceItem;
import org.jrebirth.af.api.resource.style.StyleSheetItem;
import org.jrebirth.af.api.ui.ModuleModel;
import org.jrebirth.af.core.component.factory.RegistrationPointItemBase;
import org.jrebirth.af.core.concurrent.JRebirth;
import org.jrebirth.af.core.concurrent.JRebirthThread;
import org.jrebirth.af.core.exception.handler.DefaultUncaughtExceptionHandler;
import org.jrebirth.af.core.exception.handler.JatUncaughtExceptionHandler;
import org.jrebirth.af.core.exception.handler.JitUncaughtExceptionHandler;
import org.jrebirth.af.core.exception.handler.PoolUncaughtExceptionHandler;
import org.jrebirth.af.core.log.JRLoggerFactory;
import org.jrebirth.af.core.resource.ResourceBuilders;
import org.jrebirth.af.core.resource.Resources;
import org.jrebirth.af.core.resource.provided.JRebirthColors;
import org.jrebirth.af.core.resource.provided.JRebirthStyles;
import org.jrebirth.af.core.resource.provided.parameter.CoreParameters;
import org.jrebirth.af.core.resource.provided.parameter.ResourceParameters;
import org.jrebirth.af.core.resource.provided.parameter.StageParameters;
import org.jrebirth.af.core.util.ClassUtility;
import org.jrebirth.af.core.util.ModuleUtility;
import org.jrebirth.af.preloader.JRebirthPreloader;

//import com.sun.javafx.application.LauncherImpl;

/**
 *
 * The abstract class <strong>AbstractApplication</strong> is the base class of a JRebirth Application.
 *
 * This the class to extend if you want to build an application using JRebirth WCS-MVC (Wave-Command-Service-Model-View-Controller).
 *
 * @author Sébastien Bordes
 *
 * @param <P> The root node of the stage, must extends Pane to allow children management
 */
@Configuration(".*jrebirth")
@Localized(".*_rb")
public abstract class AbstractApplication<P extends Pane> extends Application implements JRebirthApplication<P>, ApplicationMessages {

    /** Default parameter replacement string. */
    private static final String PARAM = "{}";

    /** The default suffix for Application main class. */
    private static final String APP_SUFFIX_CLASSNAME = "Application";

    /** The class logger. */
    private static final JRLogger LOGGER = JRLoggerFactory.getLogger(AbstractApplication.class);

    /** The application primary stage. */
    private transient Stage stage;

    /** The application scene. */
    private transient Scene scene;

    /** The root node of the scene built by reflection. */
    // ...
In example, SampleApplication will be launched with default JRebirth preloader (Application and Preloader classes are omitted) like below:
    public static void main(final String... args) {
        preloadAndLaunch(args);
    }
main— standard Java entry point; delegates startup to JRebirth.preloadAndLaunch(args)— boots JavaFX, runs the default or configured preloader, then starts yourAbstractApplicationsubclass.
If you want to use the JRebirthPreloader, you must include the JRebirth preloader artifact to your pom.xml file
<?xml version="1.0" encoding="UTF-8"?>
<project xmlns="http://maven.apache.org/POM/4.0.0" xmlns:xsi="http://www.w3.org/2001/XMLSchema-instance"
	xsi:schemaLocation="http://maven.apache.org/POM/4.0.0 http://maven.apache.org/xsd/maven-4.0.0.xsd">
	<modelVersion>4.0.0</modelVersion>

	<parent>
		<groupId>org.jrebirth</groupId>
		<artifactId>af</artifactId>
		<version>12.0.0-SNAPSHOT</version>
		<relativePath>..</relativePath>
	</parent>

	<groupId>org.jrebirth.af</groupId>
	<artifactId>sample</artifactId>
	<packaging>jar</packaging>

	<name>Sample Application</name>
	<url>http://www.sample.org</url>
	<description>Built with JRebirth Framework</description>

	<properties>
		<project.build.sourceEncoding>UTF-8</project.build.sourceEncoding>
		<resources.base.path>org/jrebirth/af/sample</resources.base.path>
	</properties>

	<organization>
		<name>JRebirth</name>
		<url>https://www.jrebirth.org</url>
	</organization>

	<build>
		<resources>
			<resource>
				<filtering>false</filtering>
				<directory>${basedir}/src/main/java</directory>
				<includes>
					<include>**/*.fxml</include>
					<include>**/*.properties</include>
					<include>**/*.txt</include>
				</includes>
			</resource>
			<resource>
				<filtering>true</filtering>
				<directory>${basedir}/src/main/resources</directory>
				<includes>
					<include>**/*.*</include>
				</includes>
				<excludes>
					<exclude>**/*.ttf</exclude>
				</excludes>
			</resource>
			<resource>
				<filtering>false</filtering>
				<directory>${basedir}/src/main/resources</directory>
				<includes>
					<include>**/*.ttf</include>
				</includes>
			</resource>
		</resources>

		<pluginManagement>
			<plugins>
				<plugin>
					<groupId>org.apache.maven.plugins</groupId>
					<artifactId>maven-compiler-plugin</artifactId>
					<version>${maven.compiler.plugin.version}</version>
					<configuration>
						<source>${java.version}</source>
						<target>${java.version}</target>
						<release>${java.version}</release>
						<encoding>UTF-8</encoding>
					</configuration>
				</plugin>

				<plugin>
					<groupId>org.apache.maven.plugins</groupId>
					<artifactId>maven-jar-plugin</artifactId>
					<version>${maven.jar.plugin.version}</version>

					<configuration>
    // ...
You can create your own Preloader class, JRebirth send only ProgressNotification with two kind of values:
- With double value: 0.0 to 1.0 to update the progress bar
- With integer value: > 1 to be translated into a message
Hereafter you have the default JRebirthPreloader implementation.
package org.jrebirth.af.preloader;

import javafx.animation.ScaleTransition;
import javafx.geometry.Insets;
import javafx.geometry.Pos;
import javafx.scene.Scene;
import javafx.scene.control.ProgressBar;
import javafx.scene.image.Image;
import javafx.scene.image.ImageView;
import javafx.scene.layout.StackPane;
import javafx.scene.paint.Color;
import javafx.scene.text.Text;
import javafx.stage.Stage;
import javafx.util.Duration;

/**
 *
 * The class <strong>JRebirthPreloader</strong> is the default implementation that show a JRebirth logo with a progress bar.
 *
 * @author Sébastien Bordes
 */
public class JRebirthPreloader extends AbstractJRebirthPreloader {

    /**
     * {@inheritDoc}
     */
    @Override
    protected Scene createPreloaderScene() {

        final StackPane p = new StackPane();
        p.setStyle("-fx-background-color: transparent;");

        final ImageView logo = new ImageView(new Image("JRebirth_Title.png"));
        p.getChildren().add(logo);
        StackPane.setAlignment(logo, Pos.CENTER);

        this.progressBar = new ProgressBar(0.0);
        this.progressBar.setPrefSize(460, 20);
        p.getChildren().add(this.progressBar);
        StackPane.setAlignment(this.progressBar, Pos.BOTTOM_CENTER);
        StackPane.setMargin(this.progressBar, new Insets(30));

        this.messageText = new Text("Loading");
        p.getChildren().add(this.messageText);
        StackPane.setAlignment(this.messageText, Pos.BOTTOM_CENTER);
        StackPane.setMargin(this.messageText, new Insets(10));

        final Scene scene = new Scene(p, 600, 200, Color.TRANSPARENT);
        return scene;
    }

    /**
     * {@inheritDoc}
     */
    @Override
    protected void hideStage() {
        final Stage stage = this.preloaderStage;

        final ScaleTransition st = new ScaleTransition();
        st.setFromX(1.0);
        st.setToX(0.0);
        st.setDuration(Duration.millis(400));
        st.setNode(stage.getScene().getRoot());
        st.setOnFinished(actionEvent -> stage.hide());
        st.play();
    }

    public static void main(String... args) {
        launch(args);
    }

}
createPreloaderScene()— builds the splash UI (logo, progress bar, status text).hideStage()— plays a scale-out animation before closing the preloader window.ProgressNotificationwith adouble(0.0–1.0) drives the bar; anint(> 1) selects a message id formessageText.
You can extends the AbstractJRebirthPreloader to just have to populate your scene within createPreloaderScene method, and to add a nice animation used to hide the preloader stage within hideStage method.
Minimal custom preloader:
public final class MyPreloader extends AbstractJRebirthPreloader {

    @Override
    protected Scene createPreloaderScene() {
        final StackPane root = new StackPane(new ProgressBar(0));
        return new Scene(root, 400, 120);
    }

    @Override
    protected void hideStage() {
        preloaderStage.hide();
    }
}
- Extend
AbstractJRebirthPreloader— only implement scene creation and hide animation. - Register the class in
preloadAndLaunch(MyPreloader.class, args)or Mavenjavafx.preloaderproperty when not using the default.
Application Customization
To define your own Application class you have 2 options:
- Extend AbstractApplication and implement abstract methods
- Extend DefaultApplication and only override methods you need
The AbstractApplication class will do all extra stuff required to launch JRebirth engine. You don't have to bother about it.
This class skeleton provides some hooks to allow customization of the application start up.
Please note that one method is mandatory ! You must define a first Model Class to load the first Model that will initialize the first Node attached to the RootNode (automagically created) of your Scene.
If you have used the Maven archetype org.jrebirth.archetype you have obtained this source code (otherwise that you can copy-paste it):
package org.jrebirth.af.sample;

import java.util.Arrays;
import java.util.List;

import javafx.scene.Scene;
import javafx.scene.layout.StackPane;
import javafx.stage.Stage;

import org.jrebirth.af.api.resource.ResourceItem;
import org.jrebirth.af.api.resource.font.FontItem;
import org.jrebirth.af.api.ui.Model;
import org.jrebirth.af.core.application.DefaultApplication;
import org.jrebirth.af.sample.resources.SampleFonts;
import org.jrebirth.af.sample.resources.SampleStyles;
import org.jrebirth.af.sample.ui.SampleModel;

/**
 * The class <strong>SampleApplication</strong>.
 *
 * @author
 */
public final class SampleApplication extends DefaultApplication<StackPane> {

    /**
     * Application launcher.
     *
     * @param args the command line arguments
     */
    public static void main(final String... args) {
        preloadAndLaunch(args);
    }

    /**
     * {@inheritDoc}
     */
    @Override
    public Class<? extends Model> firstModelClass() {
        return SampleModel.class;
    }

    /**
     * {@inheritDoc}
     */
    @Override
    protected void customizeStage(final Stage stage) {
        stage.setFullScreen(false);
    }

    /**
     * {@inheritDoc}
     */
    @Override
    protected void customizeScene(final Scene scene) {
        addCSS(scene, SampleStyles.MAIN);
    }

    /**
     * {@inheritDoc}
     */
    @Override
    protected List<? extends ResourceItem<?, ?, ?>> getResourceToPreload() {
        return Arrays.asList(new FontItem[] {
                SampleFonts.SPLASH,
        });
    }

}
extends DefaultApplication<StackPane>— root scene node type; framework instantiates this pane automatically.preloadAndLaunch(args)— recommended launcher (preloader + JRebirth engine).firstModelClass()— mandatory; first screen Model attached to the root pane after boot.customizeStage/customizeScene— hook to resize, title, key bindings, andaddCSSstylesheets.getResourceToPreload()— fonts/images loaded before first paint (needed for CSS@font-face).
The SampleModel.class is shown and explained into the Ui page.
Root Node
AbstractApplication & DefaultApplication classes are using a generic type that represents the first JavaFX node hold by the scene. This node will be instantiated automatically by the framework and could be accessed by calling the protected method getRootNode(). You must define it in the class definition as generic type, this type must extend Pane class.
public final class MyApp extends DefaultApplication<StackPane> {
    // Framework instantiates StackPane as scene root — access via getRootNode()
}
- Generic type parameter — root pane class (
StackPane,BorderPane, …); must extendPane. getRootNode()— protected accessor to the auto-created root after startup.
First Model Class
The method Class<? extends Model> firstModelClass() is mandatory to define which UI model will be attached to the root node of the scene.
@Override
public Class<? extends Model> firstModelClass() {
    return MainWorkbenchModel.class;
}
- Return type — any
Modelsubclass; its View is built off-screen on JTP, then attached on JAT.
This first model will be created into the JRebirth Thread Pool (JTP), then it will be attached to the root node into the JavaFX Application Thread (JAT).
First Model Descriptor
As an alternative to firstModelClass(), you can override firstModelDescriptor() to provide a ModelDescriptor with additional configuration. This is useful when your first model needs configuration data (e.g., StackModel with a StackConfig):
@Override
public ModelDescriptor firstModelDescriptor() {
    return ModelDescriptor.of(MainWorkbenchModel.class)
        .withData(StackConfig.builder().initialTab("home").build());
}
firstModelDescriptor()— alternative tofirstModelClass()when the first Model needs constructor/config data.ModelDescriptor.of(Class)— names the Model class to instantiate at startup..withData(...)— passes configuration consumed by the Model duringsetup().
Application Title
The method String applicationTitle() is simply used to define the name of the application displayed by the stage (OS window) and used by OS task bar.
By default it will retrieve values from properties file (default is jrebirth.properties):
- applicationName={} powered by JRebirth ({} is replaced by application class simple name)
- applicationVersion=1.0
@Override
protected String applicationTitle() {
    return "My App — v1.2";
}
applicationTitle()— window title and OS task-bar label; override to skip property lookup.- Return a plain string; the framework sets it on the primary
Stageduring startup.
Stage customization
The first stage object is provided by the JavaFX launcher, the method void customizeStage(final Stage stage) allows doing some stage customizations.
@Override
protected void customizeStage(final Stage stage) {
    stage.setTitle(applicationTitle());
    stage.setMaximized(true);
    stage.centerOnScreen();
}
customizeStage(Stage)— hook after the primary stage exists, before it is shown.- Safe place for size, position, icons, and fullscreen policy — not for attaching Models.
Scene customization
The scene object automatically attached to the default stage stage is built by the protected method Scene buildScene() that could be overridden as needed. By defaut it creates a default scene with these attributes :
- Width = 800 (applicationSceneWidth parameter)
- Height = 600 (applicationSceneHeight parameter)
- Background Color = Transparent (applicationSceneBgColor parameter)
- Root = Automatically built according to the generic type used
Theses properties are customizable with a properties file, this is explained below into the Configuration section.
Another method let you customize the scene :
- void customizeSscene(final Scene scene).
For example you can listen some key binding to perform a global action. The Presentation application uses it to listen <Ctrl> + <+> and <Ctrl> + <-> key combo to zoom in/out the whole scene.
This method is also useful to attach a stylesheet to the scene. The modern approach uses a StyleSheetItem resource:
addCSS(scene, MyStyles.MAIN);
This pattern delegates resource resolution to the JRebirth resource engine and is JPMS-compatible. The older scene.getStylesheets().add(loadCSS("style/sample.css")) still works but is discouraged in modular applications.
@Override
protected void customizeScene(final Scene scene) {
    addCSS(scene, SampleStyles.MAIN);
    scene.addEventFilter(KeyEvent.KEY_PRESSED, e -> {
        if (e.isControlDown() && e.getCode() == KeyCode.PLUS) {
            zoomIn();
        }
    });
}
addCSS(scene, StyleSheetItem)— preferred way to load CSS via the resource engine (JPMS-safe).customizeScene(Scene)— runs afterbuildScene(); use for global key bindings and scene-level styling.- Keep node mutations minimal here; attach Models through
firstModelClass()/ waves instead.
Resources preloading
The @Preload annotation can be used on resource enum classes to automatically register them for preloading. This replaces the need to manually list resources in getResourceToPreload(). Simply annotate your resource enum with @Preload and the framework will discover and load those resources during the pre-init phase.
Custom case for fonts: JavaFX applications are able to use fonts through programmatic declarations or with CSS declaration (in .css files. or inline).
If font used by CSS are not provided by the platform running the application, it must be provided and loaded by the application.
JRebirth provides a simple way to embed and declare font: this mechanism is explained in the custom topic: Managing Fonts.
The method List<ResourceEnum> getResourceToPreload() is used to preload resources to allow them to be used earlier (ie font in CSS declaration). They are loaded at boot in the same time than stylesheets.
@Override
protected List<? extends ResourceItem<?, ?, ?>> getResourceToPreload() {
    return Arrays.asList(SampleFonts.MAIN, SampleImages.LOGO);
}
getResourceToPreload()— fonts/images loaded during pre-init so CSS@font-faceresolves on first paint.- Prefer
@Preloadon resource enums when every member of the enum should load at boot.
Running Waves
The JRebirth Application class allow running Waves before and after the creation of the first model class.
A Wave is a JRebirth Event that could be process by any JRebirth components, they are carrying throught JRebirth classes and threads.
You can add your own wave with the two following methods :
- List<Wave>preBootWaveList()
- List<Wave>postBootWaveList()
The waves returnes will be processed sequentially althought they could be processed by different threads.
In this method you are allowed to call visible methods from the javafx.application.Application class, in example the getParameter() will give you the arguments passed to command line.
Don't forget that you can chain your waves if you need to do more than one thing.
JRebirth Analyzer example :
package org.jrebirth.af.showcase.analyzer;

import java.io.File;
import java.util.ArrayList;
import java.util.Collections;
import java.util.List;

import javafx.application.Application;
import javafx.scene.Scene;
import javafx.scene.layout.StackPane;
import javafx.stage.Stage;

import org.jrebirth.af.api.resource.ResourceItem;
import org.jrebirth.af.api.ui.Model;
import org.jrebirth.af.api.wave.Wave;
import org.jrebirth.af.api.wave.WaveGroup;
import org.jrebirth.af.core.application.DefaultApplication;
import org.jrebirth.af.core.wave.WBuilder;
import org.jrebirth.af.showcase.analyzer.service.LoadEdtFileService;
import org.jrebirth.af.showcase.analyzer.ui.editor.EditorWaves;
import org.jrebirth.af.showcase.analyzer.ui.workbench.WorkbenchModel;

/**
 * The class <strong>JRebirthAnalyzer</strong>.
 *
 * The application that demonstrate how to use JRebirth Framework.
 *
 * It also allows showing all JRebirth events.
 *
 * @author Sébastien Bordes
 */
public final class JRebirthAnalyzer extends DefaultApplication<StackPane> {

    /**
     * Application launcher.
     *
     * @param args the command line arguments
     */
    public static void main(final String... args) {
        Application.launch(JRebirthAnalyzer.class, args);
    }

    /**
     * {@inheritDoc}
     */
    @Override
    public Class<? extends Model> firstModelClass() {
        return WorkbenchModel.class;
    }

    /**
     * {@inheritDoc}
     */
    @Override
    protected String applicationTitle() {
        return "JavaFX 2.0 - JRebirth Event Analyzer";
    }

    /**
     * {@inheritDoc}
     */
    @Override
    protected void customizeScene(final Scene scene) {
        scene.getStylesheets().add("css/analyzer.css");
    }

    /**
     * {@inheritDoc}
     */
    @Override
    protected void customizeStage(final Stage stage) {
        // Center the stage
        stage.centerOnScreen();
    }

    /**
     * {@inheritDoc}
     */
    @Override
    public List<Wave> postBootWaveList() {
    // ...
Minimal boot waves (open a file passed on the command line):
@Override
protected List<Wave> postBootWaveList() {
    final String path = getParameters().getNamed().get("file");
    if (path == null) {
        return Collections.emptyList();
    }
    return Collections.singletonList(
        WBuilder.of(MyWaves.DO_OPEN)
            .data(WBuilder.waveData(MyWaves.FILE, new File(path)))
            .build());
}
postBootWaveList()— waves processed after the first Model is attached; safe to touch Application APIs.getParameters().getNamed()— reads--file=...style CLI arguments from JavaFX.WBuilder.of(...).data(...).build()— builds a wave you can chain with other boot tasks.
Default key shortcuts
The AbstractApplication class is using two defaults hotkey:
@Override
protected KeyCode fullScreenKeyCode() {
    return KeyCode.F11; // default is F10; return null to disable
}

@Override
protected KeyCode iconifiedKeyCode() {
    return null; // disable minimize shortcut
}
fullScreenKeyCode()— hotkey toggling fullscreen (default F10); returnnullto disable.iconifiedKeyCode()— hotkey iconifying the stage (default F11); returnnullto disable.- Overrides apply globally to the primary stage created by the Application class.
Exception Manager
JRebirth creates its own uncaught exception handlers in order to log exceptions that were not caught by application code.
It's possible to customize them by overriding methods listed hereafter:
- Exception handler of the JavaFX Application Thread
@Override
protected UncaughtExceptionHandler getJatUncaughtExceptionHandler() {
    return new JatUncaughtExceptionHandler(this);
}
-
getJatUncaughtExceptionHandler()— catches uncaught exceptions on the JavaFX Application Thread. -
Exception handler of the JRebirth Internal Thread
@Override
protected UncaughtExceptionHandler getJitUncaughtExceptionHandler() {
    return new JitUncaughtExceptionHandler(this);
}
-
getJitUncaughtExceptionHandler()— catches uncaught exceptions on JIT (messaging thread). -
Default Exception handler of all other threads
@Override
protected UncaughtExceptionHandler getDefaultUncaughtExceptionHandler() {
    return new DefaultUncaughtExceptionHandler(this);
}
getDefaultUncaughtExceptionHandler()— fallback for JTP slots and other pooled threads.
Initialization Phases
- [init] (#Init_Phase)
- [start] (#Start_Phase)
Init Phase
The Initialization phase is composed by:
- 00-10% - Begin Initialization (Loading Resources transition)
- 10-30% - Customizable Pre-Init Steps
- 30-40% - Loading Message Files
- 40-50% - Loading Configuration Files
- 50-60% - Attach Exception Handler and Prepare the JIT
- 60-70% - Preload Fonts and attach CSS Files
- 70-90% - Customizable Pre-Init Steps
- 100% - trigger the start phase
Customizable steps are handled by 2 methods to override:
@Override
protected void preInit() {
    notifyPreloader(new ProgressNotification(0.15));
    // custom work between 10% and 30% of boot progress
    notifyPreloader(new ProgressNotification(200)); // custom message id
}
preInit()— runs during init phase (10–30% progress); use for early custom setup.notifyPreloader(ProgressNotification(double))— fine-grained bar update (0.11–0.29).notifyPreloader(ProgressNotification(int))— message id understood by your preloader (e.g. 200, 300).
@Override
protected void postInit() {
    notifyPreloader(new ProgressNotification(0.75));
    // custom work between 70% and 90% of boot progress
    notifyPreloader(new ProgressNotification(800)); // custom message id
}
postInit()— runs late in init (70–90% progress), after fonts/CSS preload.- Progress doubles use range 0.71–0.89; message ids 800 or 900 for custom preloader text.
Start Phase
The Start phase will build and attach the scene object. Then it will start the JRebirth Thread (JIT) and show the stage.
Manage Configuration
JRebirth provides a configuration engine that allow to parse configuration files and inject values into application.
@Configuration
Your application class can use the dedicated @Configuration annotation. The AbstractApplication class use a default one:
@Configuration(".*jrebirth")
- Default on
AbstractApplication— loads*-jrebirth.propertiesfrom the classpath. - Matched files inject parameters into the application at startup.
Hereafter you have a full annotation usage:
@Configuration(value = ".*-jrebirth", extension = "properties", schedule = 60)
value = ".*-jrebirth"— regex filter; matches files likemyapp-jrebirth.properties.extension = "properties"— file suffix without the dot.schedule = 60— optional reload check interval in seconds (0 = no hot reload).
This annotation has 3 properties:
- value
- extension
- schedule
Value (default property)
Define the wildcard used to find configuration files.
The format is the same as Regex Pattern (ie: .-jrebirth => for abc-jrebirth.EXTENSION files, abc matches the . regex part)
The default value is empty, no search will be done.
Extension
Define the file extension to find configuration files.
The extension must not included the first dot (ie: properties => for abc-jrebirth.properties files)
The default value is “properties” to load properties files
Schedule
Define the delay used to check if the file has changed in order to reload configuration files.
This value is in seconds.
The default value is 0, no check will be done (this feature is still under development)
Avoid Configuration
It's possible to avoid configuration mechanism, for example if you want to use your own and don't need another process at start-up.
You can disable it by setting an empty @Configuration annotation.
@Configuration
- Empty
@Configuration— disables automatic configuration file scanning.
Manage Localization
JRebirth provides a Internationalization engine that allow to localize internal resources and also your resources. It parses properties files and inject values into application.
@Localized
Your application class can use the dedicated @Localized annotation. The AbstractApplication class use a default one:
@Localized(".*_rb")
@Localized(".*_rb")— loadsMyMessages_rb.properties,MyMessages_fr_rb.properties, etc.- Place message bundles on the classpath; keys become available through the resource engine.
This annotation has 2 properties:
- value
- schedule
Value (default property)
Define the wildcard used to find configuration files.
The format is the same as Regex Pattern (ie: ._rb => for MyMessages_rb.properties files, MyMessages matches the . regex part).
The default value is empty, no search will be done.
Schedule
Define the delay used to check if the file has changed in order to reload properties files.
This value is in seconds.
The default value is 0, no check will be done (this feature is still under development)
Avoid Localization
It's possible to avoid localization mechanism, for example if you want to improve performance by avoiding any translation into logs.
You can disable it by setting an empty @Localized annotation.
@Localized
- Empty
@Localized— disables i18n bundle scanning (useful for headless or performance-sensitive apps).